How To Crochet Ribbing On A Hat
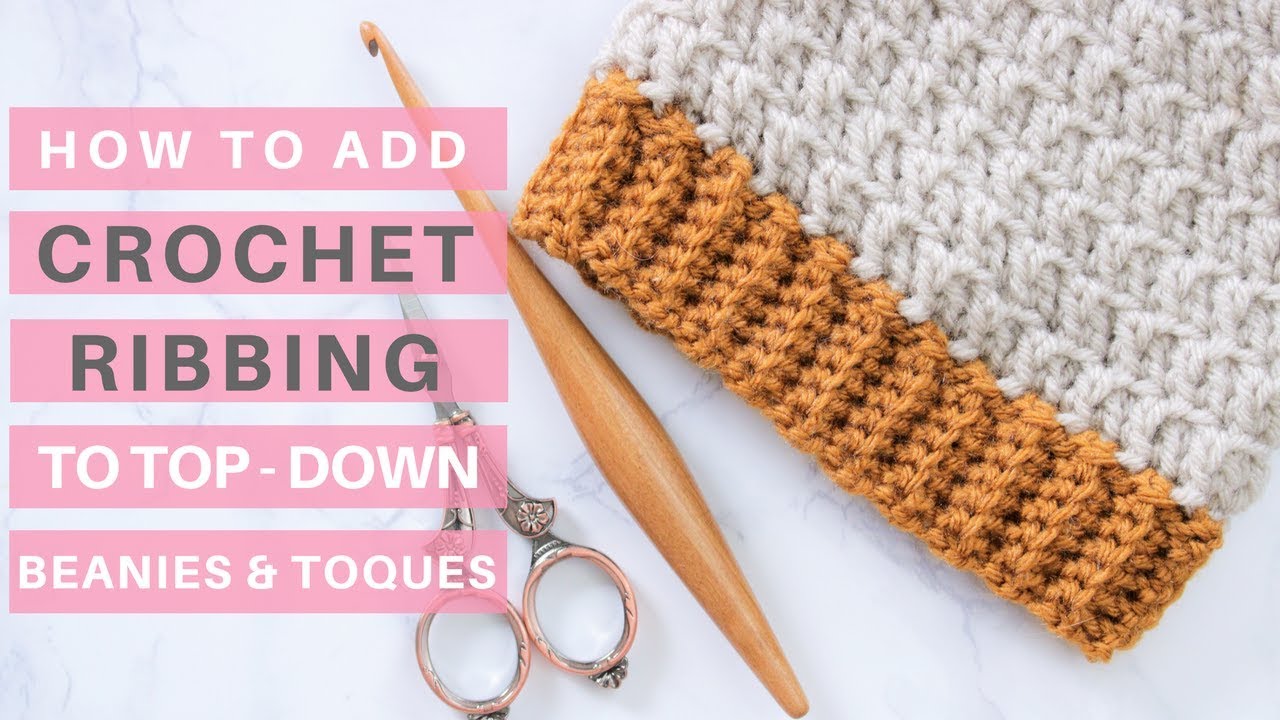
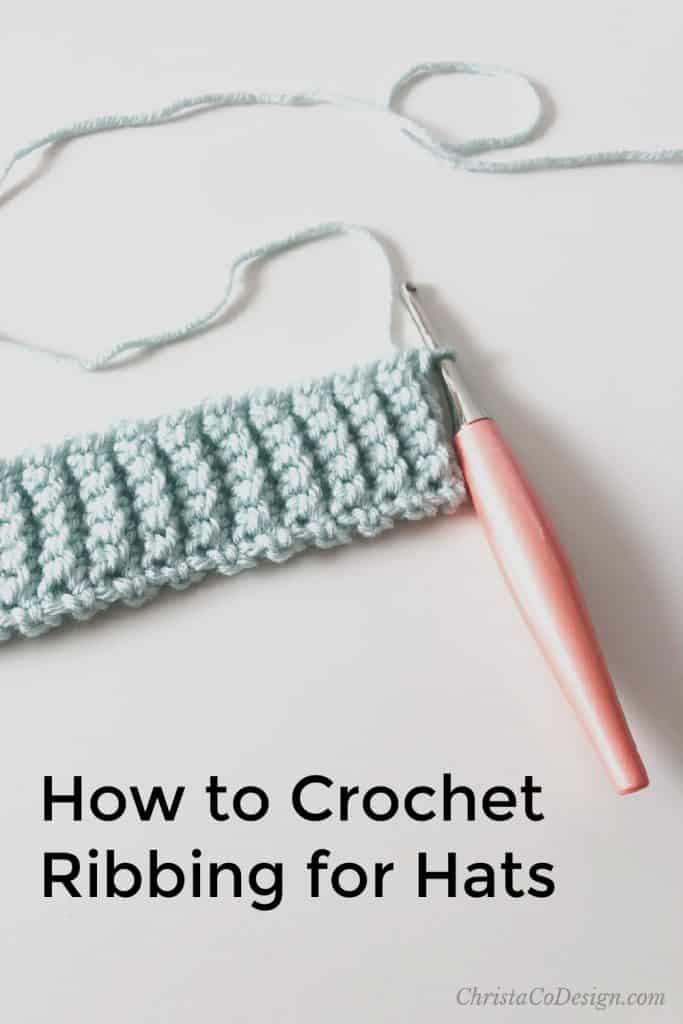
How To Crochet Ribbing On A Hat - There is no difficult increasing or decreases. Then yo again and work a dc with the three loops on your hook. Chain any number of stitches. Web this is a super easy to crochet ribbed hat. Web grab your yarn and hook. This simple single crochet ribbing is an easy way to crochet bottom up hats. Ready to find inspiration for my next project. Once the ribbing is long enough, fold it in half and sew the two ends together to form a circle. When you don’t count the first chains of each round as your first stitch and slip stitch to the first actual stitch to join, you’ll have a nice and neat seam on the back of your crochet hat. There are times when your crochet work just needs a nice rib to finish it off attractively or when you just need a bit of stretch, such as on the bottom of crochet beanie hats, or if you are making garments such as pullovers or cardigans. It doesn’t really matter but for this, i’m using some red heart yarn and a 4.00mm hook. Chain any number of stitches. Web this crochet brim technique is absolutely perfect for beanie, but you can also use it for the ribbing on sweater hems, cuffs, and necklines. This technique will create the ridge or ribbed texture that we see on hat brims, sweater cuffs, cardigan necks and blanket edgings. Yo and pull through just the first loop. Now simply repeat steps 2 & 3 until your piece is as long as you’d like! It’s super easy, lays flat every time, and and looks beautiful. In this example it will be a single crochet or half double crochet, in the back loop of a stitch from the row or round before. I sit down with my yarn, a crochet stitch book, and iced mocha. Web learn how to crochet ribbing with this easy tutorial. This simple ribbed hat works up quickly and you can make it for the whole family with my crochet pattern. This step by step crochet ribbing tutorial shows you how to start a hat brim with ribbing. There is no difficult increasing or decreases. Web learn how to crochet ribbing on hats easily. Web grab your yarn and hook. Then, continue working in rounds to create the body of the hat. Web to crochet ribbing on a hat, you can start by following one of the patterns below. There are times when your crochet work just needs a nice rib to finish it off attractively or when you just need a bit of stretch, such as on the bottom. Then insert your hook into the first chain, yo, and pull up a loop. Chain any number of stitches. Don’t worry if you’re not an expert at crochet because adding ribbing to your hats is simple to do. Now simply repeat steps 2 & 3 until your piece is as long as you’d like! Make a slip knot and chain. The result is a textured, stretchy fabric that functions like knit but crochets like a dream! Web learn how to crochet rib stitch hat. In this example it will be a single crochet or half double crochet, in the back loop of a stitch from the row or round before. Make a slip knot and chain 3. Web how to. Chain any number of stitches. I have 23 minutes before an episode of pawpatrol is over. No more front post double crochet stitches for you. This technique will also work great for adding ribbing to a crochet sweater or cardigan, or even a blanket. Then insert your hook into the first chain, yo, and pull up a loop. Web adding a textured and stretchy crocheted ribbing to your diy hats is super simple with this easily modifiable crochet ribbing for hats pattern. Don’t worry if you’re not an expert at crochet because adding ribbing to your hats is simple to do. Web welcome to this soothing crochet tutorial! Web grab your yarn and hook. (row 2) ch 1,. Once the ribbing is long enough, fold it in half and sew the two ends together to form a circle. Web learn how to add ribbing to a crochet hat! Web learn how to make a crochet hat for beginners with this easy ribbed beanie pattern. There are times when your crochet work just needs a nice rib to finish. There is no difficult increasing or decreases. Web this is a super easy to crochet ribbed hat. It doesn’t really matter but for this, i’m using some red heart yarn and a 4.00mm hook. It’s super easy, lays flat every time, and and looks beautiful. Web learn to crochet the ribbing for any head size and what to be aware. The result is a textured, stretchy fabric that functions like knit but crochets like a dream! Web to crochet ribbing on a hat, you can start by following one of the patterns below. You'll also learn how to add the single crochet round around the ribbing on hats. Make a slip knot and chain 3. In this example it will. (row 2) ch 1, turn, slip stitch in each stitch across the row. Once the ribbing is long enough, fold it in half and sew the two ends together to form a circle. When you don’t count the first chains of each round as your first stitch and slip stitch to the first actual stitch to join, you’ll have a. Then, continue working in rounds to create the body of the hat. You'll also learn how to add the single crochet round around the ribbing on hats. Then insert your hook into the first chain, yo, and pull up a loop. Web this crochet brim technique is absolutely perfect for beanie, but you can also use it for the ribbing on sweater hems, cuffs, and necklines. Web you can crochet your own ribbing from the bottom up if you want to wear a hat. This simple single crochet ribbing is an easy way to crochet bottom up hats. Web if you like the look of ribbed knitted beanies but prefer crochet, i have some great crochet ribbed beanie patterns for you! This is a very easy project that works up quickly! Can you add ribbing after you finish something crochet? When you don’t count the first chains of each round as your first stitch and slip stitch to the first actual stitch to join, you’ll have a nice and neat seam on the back of your crochet hat. There is no difficult increasing or decreases. Web to crochet ribbing on a hat, you can start by following one of the patterns below. Web learn how to crochet ribbing for a hat brim. Make a slip knot and chain 3. The result is a textured, stretchy fabric that functions like knit but crochets like a dream! Web how to crochet ribbing.
How to Crochet Ribbing on Hats Easily Bottom Up Hat Tutorial

How to crochet ribbing MyCrochetory Easy crochet hat patterns
Crochet Ribbing Tutorial *Video Tutorial & Pattern Ideas* YouTube
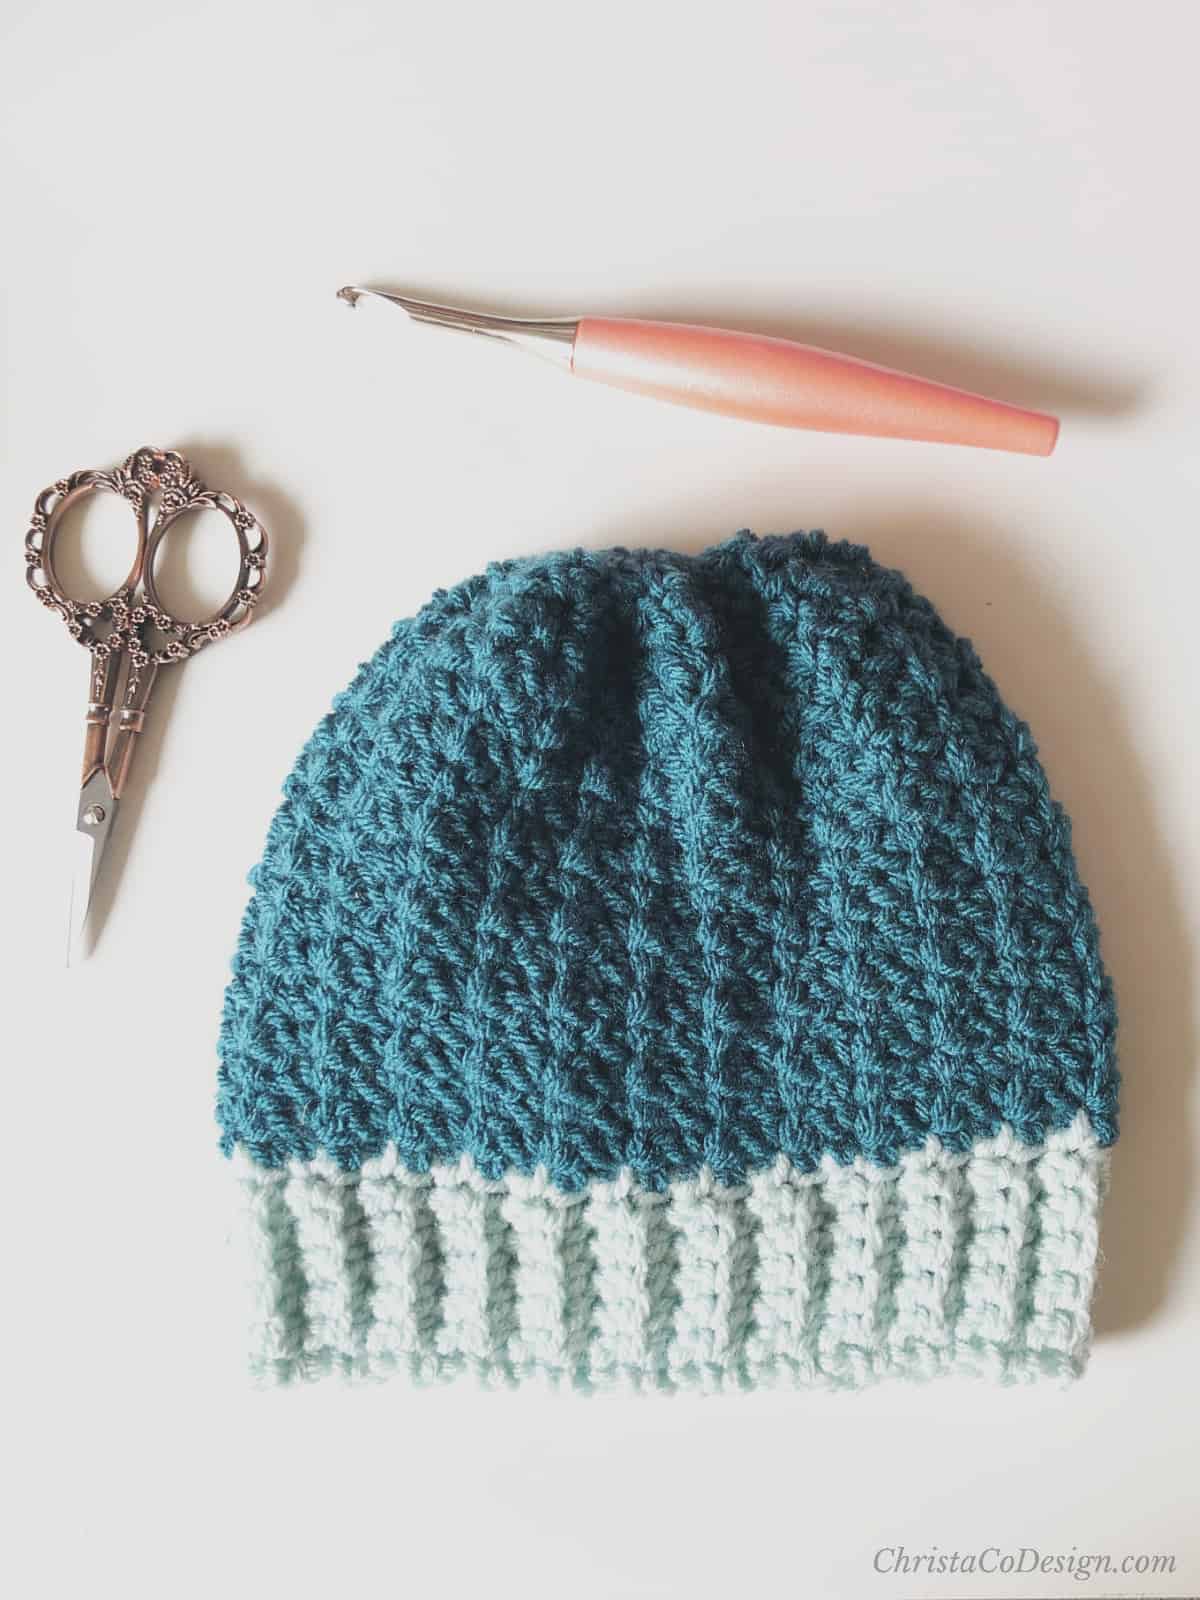
How To Crochet Ribbing For Hats With a Brim Tutorial ChristaCoDesign

How to Make the Perfect Stretchy Crochet Ribbing for Hats!

How to Add Ribbing to a Crochet Hat Photo & Video Tutorial Ned & Mimi

How to Crochet RIBBING on HATS Bottom Up YouTube

How to Crochet Ribbing for Hats ⋆ Dream a Little Bigger
How To Crochet Ribbing For Hats With a Brim Tutorial ChristaCoDesign

How to Crochet Ribbing for Hats LaptrinhX / News
One Is With Alternating Front Post And Back Post Stitches, And The Other Is By Working In The Back Loop Only Of Every Row.
Then Yo Again And Work A Dc With The Three Loops On Your Hook.
Web Learn How To Crochet Ribbing With This Easy Tutorial.
(Row 2) Ch 1, Turn, Slip Stitch In Each Stitch Across The Row.
Related Post: